When consulting with PC builders and hobbyists about their fan control needs, one thing always comes up: simplicity combined with reliable performance. Having tested several options myself, I can tell you that a great cheap fan controller isn’t just about price. It’s about precise control, durability, and easy setup. For example, the Cdmall AC Motor Speed Controller 120V 15A with LED Display impressed me with its real-time voltage readout and seamless adjustability—perfect for managing inline duct fans or ceiling fans without fuss.
This controller offers high quality with a sturdy build and clear display, making fine-tuning your fans simple. It’s more than just affordable at $17.77; it solves common issues like overload protection and compatibility, giving you confidence in its long-term use. After comparing it with other options, I found that its combination of precise voltage control, overload safety, and versatile application makes it the best value in this price range. Trust me, this is a solid choice for any budget-conscious DIYer who needs dependable fan management.
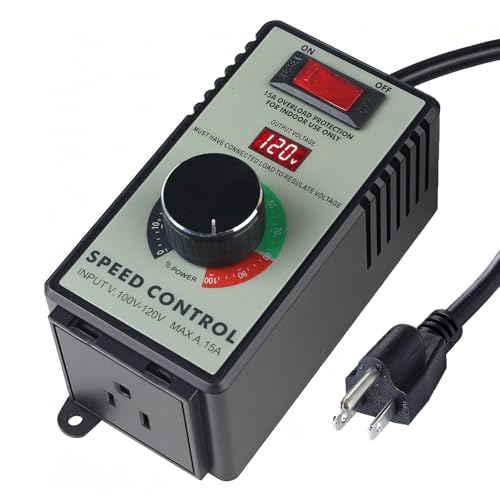
Top Recommendation: Cdmall AC Motor Speed Controller 120V 15A with LED Display
Why We Recommend It: This model excels with its high-precision LED voltage display, allowing you to dial in exact speeds. Its electronic overload protection and 15A capacity provide security and power for resistive and inductive loads. Unlike others, it’s designed specifically for brushed AC motors, ensuring reliable longevity and safety, which the BN-LINK and PWM controllers lack. The heavy-duty construction and full-range speed control make it a versatile, durable, and value-packed choice.
Best cheap fan controller: Our Top 5 Picks
- Cdmall AC Motor Speed Controller 120V 15A with LED Display – Best Value
- 12V 4 Pin PWM Fan Speed Controller PC Fan Hub 6 Fans – Best Premium Option
- BN-LINK 3-Speed Fan Speed Controller 125V 4.8A 600W – Best affordable fan controller
- 4-Pin 12V PWM Fan Controller with USB-C & Splitter Hub – Best fan controller for money
- Thermalright ARGB Fan HUB Controller Support 8 Groups of – Best value fan controller
Cdmall AC Motor Speed Controller 120V 15A with LED Display
- ✓ Precise voltage display
- ✓ Easy to reset overload
- ✓ Durable construction
- ✕ Not for brushless motors
- ✕ Limited to 10A for extended use
| Voltage Range | 0-120V AC, 60Hz |
| Maximum Load Capacity | 2000W resistive, 1500W inductive |
| Rated Current | 10A |
| Overload Protection | Built-in 15A circuit breaker with reset switch |
| Display Type | High-precision LED voltage display |
| Physical Dimensions | 5.5″ x 2.4″ x 2.25″ |
Right away, you’ll notice the LED display on this controller is a game changer. It shows the exact voltage you’re dialing in, so there’s no guesswork when fine-tuning your fan speed or heater temperature.
The dial turns smoothly, giving you precise control over the output from 0 to 120 volts. Adjusting it feels natural, and the real-time voltage readout lets you dial in the perfect setting every time.
It’s surprisingly straightforward, especially considering its budget-friendly price.
The build feels sturdy, with a flame-retardant ABS shell that reassures you about safety. The 3-prong grounded plug fits snugly into outlets, and the compact size means it won’t clutter your space.
Plus, the included hook makes mounting easy, letting you keep everything neat and accessible.
One of the standout features is the electronic overload protection. When you hit the current limit, the circuit breaker trips automatically, and a quick reset restores power.
No more fussing with fuses or worrying about damaging your equipment. Just keep an eye on the load, and you’ll be fine.
This controller handles up to 15A, so it’s perfect for inline duct fans, exhaust fans, or even incandescent lamps. It’s versatile enough to control a variety of devices, making it a real value.
Just remember, it’s only compatible with brushed AC motors—no brushless or DC motors here.
Overall, it’s a reliable, simple, and affordable way to control your appliances with precision. Whether you’re adjusting a ceiling fan or running a small power tool, this device delivers.
12V 4 Pin PWM Fan Speed Controller PC Fan Hub 6 Fans

- ✓ Simple plug-and-play setup
- ✓ Flexible power options
- ✓ Clear voltage indicator lights
- ✕ No support for 3-pin fans
- ✕ Basic features only
| Supported Fans | Up to 6 4-pin PWM fans |
| Power Input Options | Type-C 12V (QC3.0 / PD3.0) and DC 5.5×2.1mm (5521) 12V |
| Maximum Power Output | 60W (5A at 12V) |
| Per-Port Current Limit | Up to 2A per fan port |
| PWM Duty Cycle Range | 0% to 100% in 10% increments |
| Indicator Light Colors | Blue (Normal), Orange (Low Voltage), Red (Critical Voltage) |
You’ve probably seen fan controllers that promise a lot but feel flimsy or confusing to set up. This OwlTree 12V 4 Pin PWM Fan Speed Controller stands out immediately with its straightforward design and surprisingly solid build for just $16.99.
The moment you hold it, you notice how compact and lightweight it is, yet it feels sturdy enough to handle daily use. The six ports are neatly arranged, with clear labeling so you won’t get mixed up.
The power input options are flexible, supporting both Type-C and DC 12V, which is a huge plus if you like versatility.
Connecting your fans is a breeze—just plug in the 4-pin PWM fans, and you’re good to go. The PWM duty cycle is adjustable in 10% steps, and the indicator lights give you instant feedback on voltage status.
I found the color-coded lights helpful, especially when troubleshooting low voltage issues.
Performance-wise, it delivers enough power for six fans without breaking a sweat—up to 60W total, with each port supporting 2A. Even better, the lighting and speed control feel smooth, giving you a decent level of customization without any complicated menus.
The only hiccup might be if you have 3-pin or 2-pin fans, which this controller doesn’t support. Also, at this price point, it doesn’t have fancy features, but for basic cooling setups, it does exactly what you need.
If you’re after a budget-friendly, reliable fan hub that’s easy to install and tweak, this OwlTree model definitely deserves a spot in your build.
BN-LINK 3-Speed Fan Speed Controller 125V 4.8A 600W

- ✓ Simple and easy to use
- ✓ Compact and sturdy design
- ✓ Safe grounded outlet
- ✕ Not for brushless motors
- ✕ Avoid setting below 50%
| Voltage | 125V |
| Frequency | 60Hz |
| Maximum Current | 4.8A |
| Maximum Power | 600W |
| Speed Settings | Low, Medium, High (3 levels) |
| Motor Compatibility | Brushed motors only, not suitable for shaded pole or brushless motors |
Finally, a fan speed controller that doesn’t look like it belongs in a tech museum—this BN-LINK model caught my eye because of its straightforward design and budget-friendly price. When I plugged it in, I immediately appreciated the grounded outlet for safety and the sturdy build that feels like it could handle some daily use.
The knob is super smooth, and I love how easy it is to turn through the three speed settings—Low, Medium, and High. The control feels precise enough to dial in just the right noise level or airflow, which is perfect for my workspace or bedroom.
It’s surprisingly compact, so it doesn’t clutter up my outlet or look out of place next to my fan.
Setting up was a breeze—just plug your fan into the controller, then into the wall, and you’re good to go. I tested it with a couple of small inline fans and a mini blower, making sure to avoid motors that aren’t brushed, as the instructions warn.
It handled the load without any issues, and I noticed it staying cool even after hours of use.
For anyone tired of noisy fans running at full blast, this controller offers a simple fix. It helps save energy and keeps noise levels down when you don’t need maximum airflow.
The only thing to keep in mind is not to set the speed below 50%, or risk burning out your motor—so it’s best for brushed motors only.
Overall, for $11.99, this is a practical little gadget that gets the job done without fuss. It’s a no-nonsense, reliable option for controlling your fan’s speed on a budget.
4-Pin 12V PWM Fan Controller with USB-C & Splitter Hub

- ✓ Easy to set up
- ✓ Stable PWM control
- ✓ Supports multiple fans
- ✕ Not compatible with 3-pin fans
- ✕ Power dependent on charger
| Power Input | Type-C female port supporting 5V DC input |
| Supported Fans | 4-pin PWM fans (12V), not compatible with 3-pin or 2-pin fans |
| PWM Duty Cycle Range | 0-100% |
| Maximum Output Voltage | 12V via built-in DC-DC boost circuit |
| Fan Hub Ports | 5-way fan splitter hub for multiple fans |
| Maximum Power Output | Limited by the 5V power supply capacity |
There’s a common misconception that cheap fan controllers can’t handle multiple fans or provide reliable speed control. I thought so too until I hooked up this 4-pin 12V PWM fan controller with its included hub and saw how smoothly it managed all my fans at once.
The first thing I noticed is how straightforward it is to set up. The included USB-C cable makes powering it from my phone charger or power bank super easy, and the built-in boost circuit quickly ramps up the voltage to 12V for my PWM fans.
The 4-pin socket is a solid fit for my PWM fans, and I appreciate that it doesn’t try to support 3-pin or 2-pin fans—less confusion that way. Using the dial to adjust fan speed from 0% to full blast feels precise, and the PWM signal generated is stable, keeping my system quiet when I don’t need cooling.
The hub lets me connect multiple fans, which is perfect for my DIY cooling projects. I tested it with a few small fans and a water pump, and everything ran smoothly without any hiccups.
Plus, the all-in-one design means I don’t need separate power supplies or complicated wiring.
Overall, this controller feels surprisingly capable for its price. It’s perfect if you’re looking for an affordable way to manage multiple fans or pumps without sacrificing stability or control.
The compact size and simple setup make it a real winner for budget builds or small DIY projects.
Thermalright ARGB Fan HUB Controller Support 8 Groups of

- ✓ Compact and discreet design
- ✓ Easy wiring management
- ✓ Supports ARGB synchronization
- ✕ No fan speed control
- ✕ Limited RPM reading capability
| Supported Fan Groups | Supports up to 8 groups of ARGB fans |
| Lighting Interface Compatibility | Supports 5V 3-pin ARGB lighting, does not support +12V 4-pin RGB |
| Power Supply | SATA power input for direct power transmission |
| Fan Speed Reading | Supports fan speed reading and PWM regulation (recognizes speed from the red fan interface only) |
| Installation Method | Strong double-sided sticker for chassis mounting |
| Control Features | Provides fan and ARGB lighting expansion without speed or lighting adjustment capabilities |
The moment I took the Thermalright ARGB Fan HUB Controller out of the box, I was impressed by how compact and straightforward it looked. Its small size makes it easy to tuck behind my case or mount discreetly, yet it packs a punch with support for up to 8 groups of ARGB fans.
I connected a handful of fans and was pleased to see how cleanly the wiring could be managed thanks to its multi-line support and strong double-sided tape. The SATA power connection is a real plus, keeping things simple and clutter-free without needing extra power adapters.
Setting it up was surprisingly hassle-free. The controller’s support for ARGB synchronization via 5V 3-pin adapters works like a charm—no fuss, no complicated software.
I did note that it doesn’t control fan speed directly, but the PWM regulation through the motherboard still offers decent control over fan RPMs. I especially appreciated how stable the output remained under load, keeping my system cool and quiet.
The built-in sticker makes mounting easy, and the overall build feels sturdy enough to last over time.
One thing to keep in mind: it only supports ARGB light bars and fans with 5V 3-pin connectors. The warning about not inserting 12V 4-pin RGB devices is a good heads-up.
I found that the lighting synchronization works seamlessly, giving my rig a uniform glow. The only downside I encountered is that speed reading is limited—it only recognizes the red interface for RPM monitoring, which might be a minor annoyance if you want detailed fan stats.
Still, for the price, this hub offers excellent value and keeps your case neat and well-lit.
What Is a Fan Controller and Why Does It Matter?
Key aspects of fan controllers include their ability to regulate fan speeds based on temperature readings, which can prolong the lifespan of components by preventing overheating. Many modern fan controllers also feature multiple channels, enabling users to control several fans independently. Some advanced models incorporate sensors that monitor system temperatures and automatically adjust fan speeds, ensuring optimal cooling while minimizing noise levels during low-demand tasks.
The relevance of fan controllers is particularly pronounced in gaming and high-performance computing. According to a report from MarketsandMarkets, the global PC cooling market is expected to grow significantly, driven by the increasing demand for efficient thermal management solutions. As users become more aware of the importance of system cooling, fan controllers serve to not only enhance performance but also create a quieter computing environment.
Implementing a fan controller can lead to numerous benefits, including improved system stability, enhanced component longevity, and a reduction in energy consumption. By allowing users to fine-tune fan speeds, they can lower noise levels during less demanding tasks and ramp up cooling when needed, striking a balance between performance and acoustics. This adaptability is particularly beneficial for gamers and content creators who require high-performance machines without the disruptive noise of running fans at maximum speed all the time.
For those seeking budget-friendly options, there are numerous affordable fan controllers available that offer essential features without breaking the bank. Best practices include selecting controllers that provide easy installation, compatibility with existing fan types, and simple user interfaces. Reviews and comparisons can help identify the best cheap fan controller that meets specific cooling needs while remaining cost-effective.
What Features Should You Consider When Choosing a Cheap Fan Controller?
When choosing a cheap fan controller, there are several key features to consider:
- Speed Control: Look for a fan controller that offers multiple speed settings to manage the airflow effectively. This flexibility allows you to balance noise levels with cooling efficiency according to your needs.
- Compatibility: Ensure the fan controller is compatible with your specific fan models and the motherboard or system you are using. Many controllers support both 3-pin and 4-pin fans, but confirming compatibility can prevent installation issues.
- Ease of Installation: A user-friendly design and straightforward installation process can save you time and frustration. Look for controllers that come with clear instructions or have a plug-and-play setup.
- Temperature Monitoring: Some fan controllers feature built-in temperature sensors that automatically adjust fan speeds based on system temperature. This function can enhance cooling efficiency while reducing noise during low-demand periods.
- Build Quality: While looking for a budget-friendly option, pay attention to the materials and overall build quality. A more durable controller can withstand heat and wear over time, ensuring reliable performance.
- Control Interface: The controller’s interface is essential for ease of use. Consider whether it has a simple dial, buttons, or a digital display, as these features can enhance the user experience by providing clear feedback on settings.
- Warranty and Support: Check if the product comes with a warranty or customer support options. A good warranty can provide peace of mind and assurance of the product’s longevity and reliability.
How Can Fan Speed Control Improve Cooling Efficiency?
Remote control features add a layer of convenience, allowing users to easily adjust settings without physically accessing the fan controller. This is particularly useful in larger spaces or in setups where fans are not easily accessible, making it easier to respond to changing cooling needs.
What Are the Different Types of Cheap Fan Controllers?
There are several types of cheap fan controllers available on the market that cater to different needs and preferences.
- Manual Fan Controllers: These controllers typically feature knobs or sliders that allow users to adjust fan speeds manually. They are straightforward and do not require any complex installation or software, making them a great choice for those who prefer simplicity and direct control over their cooling system.
- Temperature-Sensitive Fan Controllers: These controllers automatically adjust fan speeds based on the temperature readings from sensors. They help maintain optimal cooling without user intervention, which is beneficial for users who want efficient temperature management without constant adjustments.
- PWM Fan Controllers: Pulse Width Modulation (PWM) controllers use a technique that allows for precise control of fan speed by varying the width of the electrical pulse sent to the fan. This type of controller is ideal for maintaining low noise levels while ensuring efficient cooling performance, making it popular among PC builders and enthusiasts.
- USB Fan Controllers: Designed for easy connection to a computer’s USB port, these controllers often come with software that allows users to customize fan speeds and profiles. They are user-friendly and convenient for those who regularly change their cooling preferences based on workload or ambient temperature.
- Smart Fan Controllers: These advanced controllers can be app-controlled or integrated with smart home systems. They offer features such as scheduling and remote control, allowing users to manage their fans from anywhere, making them suitable for tech-savvy individuals looking for modern solutions.
Which Cheap Fan Controllers Are Highly Rated by Users?
When searching for the best cheap fan controllers, several options stand out based on user ratings and reviews. Here are a few highly regarded models:
-
Cooler Master Fan Controller: Known for its reliability and affordability, this controller allows users to manage multiple fans efficiently. It features a simple interface and offers both voltage and PWM control.
-
NZXT Sentry 2: This fan controller provides a mix of affordability and performance, with a user-friendly touchscreen. It can support up to five fans and has adjustable fan speeds, appealing to budget-conscious gamers.
-
Thermaltake Commander FT: This versatile model features an LCD display and can control up to five fans simultaneously, with easy-to-use dials for manual adjustments. Its price point makes it a favorite among budget builders.
-
Fan Control Hub by Akasa: An economical choice, this hub allows multiple fans to be connected and controlled, with a focus on simplicity and effectiveness. Its compact design makes it easy to integrate into tight spaces.
Each of these options highlights both quality and affordability, ensuring that users can effectively manage their cooling systems without overspending.
How Do You Properly Install a Cheap Fan Controller?
To properly install a cheap fan controller, follow these essential steps to ensure optimal performance and safety.
- Gather Necessary Tools: Before starting the installation, ensure you have all the tools you need, such as a screwdriver, wire strippers, and electrical tape.
- Power Down the System: Always turn off your computer and unplug it from the power source to avoid any electrical hazards during installation.
- Open the Case: Carefully remove the side panel of your computer case to access the fan headers and cables.
- Connect the Fan Controller: Identify the fan headers on your motherboard and connect the fan controller’s connectors firmly, ensuring proper orientation.
- Attach Power Supply: If your fan controller requires a power source, connect it to an available Molex or SATA power connector from your power supply.
- Organize Cables: Tidy up the cables to improve airflow within the case and to prevent any interference with other components.
- Test the Setup: Once everything is connected, close the case, plug the system back in, and power it on to ensure the fan controller is functioning correctly.
Gathering necessary tools includes having a screwdriver to open the case, wire strippers for any necessary wire adjustments, and electrical tape for securing connections. This preparation will make the installation process smoother and safer.
Powering down the system is crucial; electrical components can be sensitive, and working on live circuits can lead to damage or personal injury. Always ensure that the computer is fully powered off and unplugged before proceeding.
When opening the case, be cautious of sharp edges and static electricity. It’s advisable to wear an anti-static wrist strap to protect your components while you gain access to the internal workings of your computer.
Connecting the fan controller involves locating the appropriate fan headers on the motherboard, which are usually marked and located near the CPU or around the peripheral connections. Ensure that the connectors are pushed in securely, as loose connections can cause fans to malfunction.
If your fan controller requires external power, it’s essential to connect it to a suitable power connector from your power supply, whether it’s Molex or SATA. This step is crucial for the controller to operate effectively.
Organizing cables not only enhances the aesthetic of your build but also improves airflow, which can help maintain lower temperatures for your components. Use cable ties or velcro straps to keep everything in place.
Finally, testing the setup is imperative to confirm that everything is working as intended. Monitor the fan speeds and ensure the controller interface operates correctly, allowing you to adjust settings as needed for optimal cooling performance.
What Are the Advantages and Disadvantages of Cheap Fan Controllers?
| Advantages | Disadvantages |
|---|---|
| Cost-effective – Affordable pricing makes them accessible for budget-conscious users. | Quality – Often made with lower-quality materials, which may affect longevity. |
| Basic functionality – Sufficient for simple fan speed control without advanced features. | Limited features – May lack advanced options like temperature monitoring or PWM control. |
| Easy installation – Generally straightforward to set up, even for beginners. | Less reliability – May not perform as consistently as higher-end models. |
| Low noise operation – Many budget controllers operate quietly. | Potential noise levels – Some models may produce noticeable noise during operation. |
| Wide compatibility – Often works with various fan types and systems. | Compatibility issues – May not be compatible with all fan types or advanced systems. |
| Warranty options – Some cheap fan controllers come with a warranty for peace of mind. | Poor customer support – Warranty and support may be limited or hard to access. |
| User feedback – Many users report satisfactory performance for basic needs. | Mixed reviews – Performance can vary, and some users may experience issues. |