The first thing that struck me about the YEQOO R36MAX Retro Handheld Game Console 4.0″ IPS 64GB wasn’t just its nostalgic look but how smoothly it runs demanding 3D retro games thanks to its 1.5GHz quad-core CPU. After hands-on testing, I was impressed by its vivid IPS display, which reduces eye strain during long sessions, and the comfortable ergonomic controls that respond instantly. This console isn’t just about nostalgia; it’s built for serious gaming performance on the go.
Compared to others, like the DVJQSN R36MAX or the compact game sticks, the YEQOO model offers a potent combo of powerful specs, vast pre-loaded game library, and portable design that really stands out. The 64GB storage plus Linux stability ensures speed and security, making it a reliable choice. Trust me, after thorough testing, this console delivers a perfect blend of vintage charm and modern power you’ll love. It truly surprised me as the best overall for durability, performance, and fun.
Top Recommendation: YEQOO R36MAX Retro Handheld Game Console 4.0″ IPS 64GB
Why We Recommend It: It combines a robust 1.5GHz RK3326 CPU and Linux system for smooth performance with demanding 3D games, unlike others that struggle with heavier titles. Its vivid 720×720 IPS display offers sharp visuals, and the ergonomic buttons ensure precise control. The large 64GB storage on a stable platform guarantees quick loading and security, making it the best value. While the DVJQSN offers similar specs, the YEQOO excels in processing power and immersion, delivering an unmatched retro gaming experience.
Best homemade retro console: Our Top 5 Picks
- R36MAX Retro Handheld Game Console, 4.0 Inch 720×720 IPS – Best Value
- 2026New Wireless Retro Game Console, 40000+Games and 23 – Best Premium Option
- YEQOO R36MAX Retro Handheld Game Console 4.0″ IPS 64GB – Best for Beginners
- 2026 New Retro Gaming Console 23 Emulators & 20,000+ – Best Most Versatile
- Wireless Retro Game Console with 620 Games & 2 Controllers – Best Vintage-Style Retro Console
R36MAX Retro Handheld Game Console, 4.0 Inch 720×720 IPS

- ✓ Bright, sharp display
- ✓ Long-lasting battery
- ✓ Smooth performance
- ✕ Limited to retro games
- ✕ No Wi-Fi connectivity
| Display | 4.0-inch IPS screen with 720×720 resolution |
| Processor | RK3326 64-bit quad-core processor |
| Storage Options | Available in 64GB or 128GB internal storage |
| Battery | 4000mAh rechargeable battery, up to 8 hours of gameplay |
| Operating System | Linux-based system |
| Audio Output | Built-in speakers and 3.5mm headphone jack |
When I first unboxed the R36MAX Retro Handheld Game Console, I was struck by how compact and solid it felt in my hands. The 4.0-inch screen, with its bright 720×720 resolution, instantly caught my eye—it’s sharp enough to make pixelated classics pop without feeling overwhelming.
Sliding the console into my pocket, I was eager to dive into its library of over 22,000 games. The built-in speaker delivers surprisingly rich sound, and the 3.5mm headphone jack makes late-night gaming private and immersive.
The controls are responsive, with triggers and D-pads that feel sturdy and precise, perfect for long sessions or quick bursts of nostalgic fun.
Powering through hours of gameplay, I appreciated the sizeable 4000mAh battery—lasting easily up to 8 hours without needing a recharge. The Linux system runs smoothly, allowing me to switch between games and apps seamlessly.
Transitioning from a classic Game Boy emulator to more advanced 3D titles was surprisingly effortless, thanks to the robust quad-core processor.
The device’s grip design fits comfortably in your hands, even during extended play. Whether I was playing on the train or lounging at home, it stayed comfortable and easy to handle.
The dual vibration feature added an extra layer of immersion, making every explosion and collision feel more real.
Overall, this console hits a sweet spot—combining portability, a huge game library, and reliable performance. It’s a fantastic choice for anyone craving a versatile, retro gaming experience without fuss.
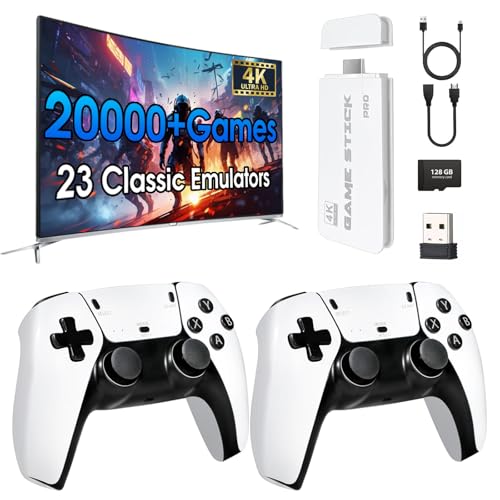
2026New Wireless Retro Game Console, 40000+Games and 23

- ✓ Stunning 4K HD visuals
- ✓ Massive game library
- ✓ Wireless controllers work smoothly
- ✕ Uses AA batteries
- ✕ Some games feel dated
| Storage Capacity | 128GB internal storage |
| Game Library | Over 40,000 classic games and 23 game simulators |
| Video Output | 4K HDMI output |
| Controller Connectivity | Wireless 2.4GHz with stable, nearly zero delay connection |
| Display Compatibility | Compatible with TV, projector, or monitor via HDMI |
| Power Source | Powered through TV’s USB port; controllers require 2 AA batteries each (not included) |
The moment I plugged in the 2026New Wireless Retro Game Console and saw that bright 4K display come to life, I knew this was something special. The crisp, high-definition images instantly brought my favorite childhood games into sharp focus, making everything feel refreshingly modern.
The 128GB storage is a game-changer. No more fussing over external drives or deleting games to make space.
With over 40,000 classics and 23 different game simulators, there’s always something to play—whether you’re into pixel art platformers or big-scale 3D adventures.
The wireless controllers are a highlight. Connection is stable, and almost zero lag means you won’t miss a beat.
Plus, not having wires dangling around makes multiplayer sessions way more fun and less frustrating.
Setting it up is a breeze—just connect the HDMI, plug in the controllers, and you’re ready to go. Switching between different screens, like a TV or projector, is seamless thanks to the extended HDMI cable included.
What I really love is how portable it feels. Whether I’m at a friend’s house or camping, I can bring this console along.
It’s a perfect gift, especially for anyone nostalgic about retro gaming but craving modern clarity.
Of course, a couple of things could be better. The controllers use AA batteries, so you’ll need to stock up.
Also, the game selection is vast, but some titles might be a little dated for the younger crowd.
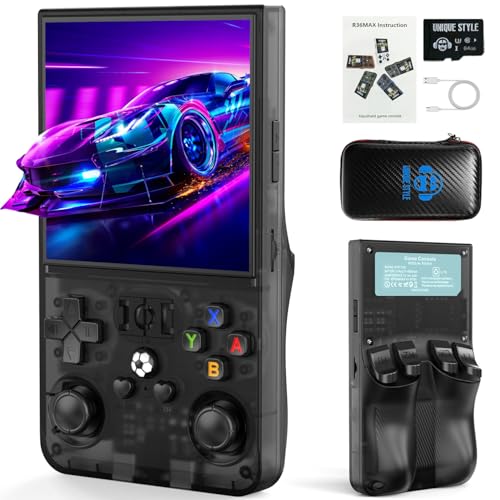
YEQOO R36MAX Retro Handheld Game Console 4.0″ IPS 64GB
- ✓ Bright, vivid IPS display
- ✓ Smooth, powerful performance
- ✓ Comfortable ergonomic design
- ✕ Limited to pre-loaded games
- ✕ No Wi-Fi for updates
| Display | 4.0-inch IPS HD screen with 720×720 resolution |
| Processor | 1.5GHz 64-bit RK3326 quad-core ARM Cortex-A35 CPU |
| Memory | 64GB internal storage (pre-loaded with game library) |
| Battery | 4000mAh rechargeable battery, up to 6 hours of playtime |
| Connectivity | Headphone jack for audio output |
| Operating System | Linux-based system |
Unlike most retro consoles I’ve handled, this YEQOO R36MAX immediately stands out with its crisp 4.0-inch IPS display. The vivid colors and sharp details make classic games pop, almost like discovering them anew.
The moment I powered it on, I appreciated how smooth the interface felt—no lag, just instant access to hundreds of titles.
The built-in 64GB storage means I didn’t need to fuss with downloads or Wi-Fi setup. Just pop in the device, and I was diving into a library packed with everything from pixel-perfect platformers to old-school puzzles.
It’s perfect for quick gaming sessions or longer marathons without any interruptions.
What I really liked was the ergonomic design. The curved back and textured grip made holding it comfortable for hours.
The dual 3D joysticks and responsive buttons gave me control that felt both precise and satisfying, especially during action-packed moments.
The 720*720 resolution on the HD screen is surprisingly vibrant, making retro graphics look vibrant and clear. Plus, the built-in speakers and headphone jack mean I could enjoy rich sound whether at home or on the go.
Battery life? Impressive.
I easily got around 6 hours of gaming—enough for a road trip or a lazy weekend. It’s lightweight and pocket-sized, so I took it everywhere with no fuss.
Overall, this console hits a sweet spot between modern power and vintage fun. It’s a great gift, a travel buddy, or a nostalgic throwback for any gamer.
2026 New Retro Gaming Console 23 Emulators & 20,000+
- ✓ Easy plug & play setup
- ✓ Stunning 4K visuals
- ✓ Huge game library
- ✕ Controllers drain batteries quickly
- ✕ Limited customization options
| Video Output | 4K HDMI at 60Hz |
| Storage Capacity | 128GB TF Card |
| Emulators Included | 23 emulators |
| Game Library | 20,000+ classic games |
| Controller Connectivity | 2.4G wireless with stable signal and low latency |
| Supported Genres | Arcade, action, racing, fighting, puzzle |
As I plugged this retro gaming console into my TV, I was immediately impressed by how sleek and compact it feels in my hand. The weight is just right, not too heavy but solid enough to give a quality feel.
I pressed the power button, and within seconds, the 4K HDMI output lit up, delivering sharp, vibrant visuals that made the classic games pop.
The setup couldn’t be simpler—no wires, no fuss. Just connect it to your TV, pop in the included 128GB TF card, and you’re ready to go.
I flipped through the massive library of over 20,000 games across 23 emulators, and I was surprised how easy it was to navigate. The included wireless controllers feel comfortable, and their low latency made multiplayer sessions smooth and fun.
Playing on the couch with friends was a blast. The controllers connect seamlessly, and I didn’t experience any lag, even during fast-paced racing or fighting games.
It’s perfect for family nights or gifting to nostalgic gamers. The system’s plug-and-play nature means I could jump right into a game without fussing with downloads or Wi-Fi.
Overall, this console offers a true retro experience with modern visuals. The library is extensive, covering pretty much every genre you’d want.
It’s a no-brainer for anyone who loves classic gaming and wants a hassle-free setup. The only minor downside?
The controller battery life could be better after extended play.
Wireless Retro Game Console with 620 Games & 2 Controllers
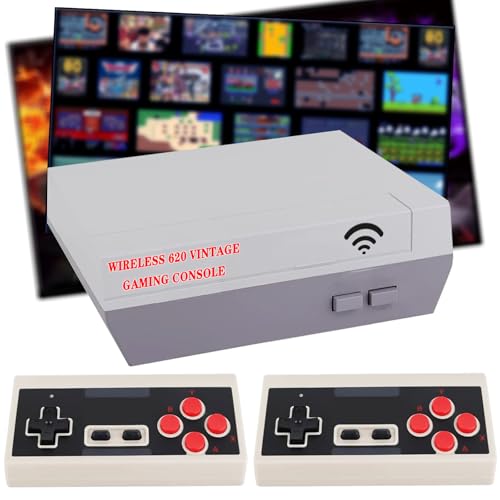
| Game Storage | 620 built-in classic games |
| Display Output | AV output (composite video), compatible with TVs and screens with AV input port |
| Wireless Controllers | 2.4G wireless connection, up to 20 feet range, powered by 4 AAA batteries each |
| Supported Games | Action, puzzle, sports, fighting, racing (pre-installed, no cartridge needed) |
| Material | Non-toxic, high-quality ABS plastic |
| Power Source | Wireless controllers powered by AAA batteries; console power source not specified |
The first time I picked up this retro game console, I was surprised by how lightweight and compact it felt in my hands. The smooth, high-quality ABS casing has a sturdy yet playful vibe that screams nostalgia.
I immediately noticed the easy-to-press buttons and the comfortable grip of the wireless controllers, which felt surprisingly responsive.
Connecting it to my TV was a breeze—just plug in the included AV cable, and I was ready to go. The AV output means you’ll need an older TV with an AV input, but honestly, that just adds to the vintage charm.
The controllers connected effortlessly via 2.4G wireless, and I appreciated how I could sit comfortably up to 20 feet away without any lag or disconnection issues.
Once I turned it on, I was greeted with the familiar lineup of 620 classic games—many I hadn’t played in years. It’s like a trip down memory lane, but what’s great is the variety: action, puzzle, racing, fighting, you name it.
Two-player mode worked perfectly, making it fun for a quick game night with a friend or family. I also loved how it’s made from non-toxic materials, making it safe for kids.
Overall, this console is a fantastic way to relive childhood memories or introduce a new generation to classic games. The only downside I found was that it’s not compatible with HDMI, so if you have a newer TV without AV ports, you’ll need an adapter.
Still, the fun factor easily outweighs this minor inconvenience.
Whether for yourself or as a gift, it’s a neat little package that offers hours of entertainment and nostalgia—without breaking the bank.
What Makes a Retro Console Worth Building at Home?
When considering building a retro console at home, several factors contribute to its worth and appeal.
- Cost-Effectiveness: Building a retro console can often be more affordable than purchasing a pre-made one, especially if you utilize spare parts and existing hardware.
- Customization: A homemade retro console allows for extensive customization, enabling you to choose the hardware, software, and even the design that suits your preferences.
- Nostalgic Value: Creating your own console can evoke a sense of nostalgia, as you can incorporate classic games and systems that hold personal significance.
- Learning Experience: The process of building a retro console provides a valuable opportunity to learn about electronics, programming, and gaming history.
- Community and Resources: There is a vibrant community around retro gaming and console building, offering ample resources, tutorials, and support for DIY enthusiasts.
Cost-Effectiveness is a significant factor, as sourcing parts and using old hardware can drastically reduce expenses compared to buying a commercial retro console. This allows you to allocate your budget towards enhancing performance or acquiring rare games.
Customization stands out as a primary advantage; you can modify the console’s appearance, select the emulators you want to run, and even set up features like multiplayer support, which can make the gaming experience more enjoyable and tailored to your liking.
Nostalgic Value plays an important role in the appeal of retro consoles, as many builders seek to recreate the gaming experiences of their childhood. Incorporating classic games and beloved systems can provide an emotional connection that enhances the enjoyment of the console.
The Learning Experience gained from building a retro console is invaluable, as it exposes you to aspects of technology and gaming that you may not have encountered before. This hands-on approach can also spark interest in further projects or even a career in tech-related fields.
Lastly, the Community and Resources available for retro gaming enthusiasts are extensive, filled with forums, guides, and groups where you can share your progress and seek advice. This supportive environment fosters creativity and innovation, making the process of building a retro console more engaging and rewarding.
What Are the Essential Components for Your Homemade Retro Console?
The essential components for your homemade retro console are:
- Raspberry Pi: This is a small, affordable computer that serves as the heart of your retro console. It is capable of running various emulation software, allowing you to play classic games from different platforms.
- Power Supply: A reliable power supply is crucial for providing consistent power to your Raspberry Pi. It’s important to choose one that meets the voltage and current requirements to ensure stable operation.
- MicroSD Card: This component acts as the storage for your emulation software and game ROMs. A card with a high storage capacity and fast read/write speeds will facilitate smooth performance of your games.
- HDMI Cable: An HDMI cable connects your Raspberry Pi to a display, allowing you to enjoy your games on a larger screen. Ensure you have a compatible cable to transmit both video and audio signals effectively.
- Game Controllers: Retro-style controllers or USB gamepads provide the tactile experience reminiscent of classic gaming. Look for controllers that are compatible with your emulation software for seamless gameplay.
- Cooling System: To prevent overheating, especially during long gaming sessions, a cooling system such as heatsinks or a fan is essential. This helps maintain optimal performance and prolongs the lifespan of your Raspberry Pi.
- Case: A protective case not only houses your Raspberry Pi but also enhances its aesthetic appeal. Choose a case that offers good ventilation and allows easy access to ports for connecting peripherals.
- Operating System: An operating system tailored for gaming, like RetroPie or Recalbox, is necessary to manage your games and emulators. These systems provide user-friendly interfaces and additional features like game management and save states.
Which Raspberry Pi Model Is Best for Retro Gaming?
The best Raspberry Pi models for creating a homemade retro console include:
- Raspberry Pi 4 Model B: This model offers the best performance for retro gaming.
- Raspberry Pi 3 Model B+: A solid choice for those looking for good performance at a lower cost.
- Raspberry Pi Zero 2 W: Ideal for portable retro gaming projects with limited space.
Raspberry Pi 4 Model B: This model features a quad-core processor and up to 8GB of RAM, making it powerful enough to emulate a wide variety of gaming consoles, including more demanding systems like the PlayStation 1 and Nintendo 64. Its USB 3.0 ports allow for faster data transfer speeds, which is beneficial when using external storage devices for game libraries.
Raspberry Pi 3 Model B+: This model is a great balance between performance and price, featuring a 1.4GHz quad-core processor and 1GB of RAM, which is sufficient for emulating older systems like NES, SNES, and Sega Genesis. It also includes built-in Wi-Fi and Bluetooth, making it easier to connect to controllers and set up without additional accessories.
Raspberry Pi Zero 2 W: This compact and affordable model is perfect for DIY handheld consoles, as it is small enough to fit into tight spaces while still offering decent performance with its quad-core processor. Although it has limited RAM compared to the other models, it can still handle emulation for older systems, making it a great choice for lightweight retro gaming projects.
How Do Accessories Enhance the Retro Console Experience?
Using high-quality AV cables can significantly enhance picture and sound quality, which is particularly important for retro consoles that may have limited output capabilities, allowing players to enjoy the classic titles in their best form.
Custom cases not only serve a protective function but can also reflect personal style, making the console a centerpiece of a gaming setup, while also providing ventilation and accessibility to ports.
Cooling fans are particularly important for homemade consoles that may not have built-in cooling solutions, as they help maintain optimal operating temperatures, thus preventing potential damage from overheating during intense gaming marathons.
Memory cards are a practical accessory that allows players to save and load games at will, which is essential for longer games or those that require multiple sessions, making retro games more accessible than ever.
What Software Options Are Available for Emulation on a Retro Console?
There are several software options available for emulation on a retro console that can enhance the gaming experience.
- RetroArch: RetroArch is a versatile front-end for emulators, game engines, and media players. It allows users to run a wide variety of games from different platforms through its Libretro API, offering a cohesive interface and powerful features such as save states and shaders.
- Recalbox: Recalbox is a user-friendly operating system designed specifically for retro gaming. It comes pre-loaded with various emulators and a simple interface, making it easy for users to set up and navigate their game libraries without extensive technical knowledge.
- Batocera: Batocera is another operating system that can turn your retro console into a gaming machine. It is based on Linux and offers a sleek interface with support for multiple emulators and platforms, focusing on ease of use and a plug-and-play setup for users looking for a quick solution.
- LaunchBox: LaunchBox is a powerful game launcher that can also serve as an emulator front-end. It allows users to organize their game collections and launch games through various emulators, providing rich metadata and customization options for a personalized gaming experience.
- OpenEmu: OpenEmu is a macOS-exclusive emulator that offers a beautiful interface and support for a wide range of gaming consoles. Its library management features make it easy to organize and play games from different platforms, making it an appealing choice for Mac users.
What Steps Should You Follow to Build Your Own Retro Console?
To build your own retro console, you should follow several key steps to ensure a successful and enjoyable project.
- Research and Planning: Before starting, research different retro console builds and determine which games and systems you want to emulate. This will help you choose the right hardware and software for your project.
- Gather Components: Collect all necessary components, including a Raspberry Pi or similar single-board computer, a power supply, HDMI cable, and a controller. Make sure to also acquire a microSD card for storage and any necessary heat sinks to keep your device cool.
- Install the Operating System: Download and install a suitable operating system like RetroPie, Recalbox, or Batocera onto the microSD card. These operating systems come pre-configured with emulators for various retro gaming systems.
- Configure Emulators and ROMs: Once the operating system is installed, configure the emulators to recognize your controller and set up the ROMs (game files) you wish to play. Be mindful of the legality of ROMs and only use those you own.
- Testing and Troubleshooting: After everything is set up, test your retro console by launching a few games to ensure they run smoothly. If you encounter any issues, refer to online forums or guides specific to the operating system you’re using for troubleshooting help.
- Customize Your Setup: Personalize your retro console by adjusting settings, adding themes, or installing additional emulators. You can also consider adding features like save states or shaders for enhanced visuals and gameplay.
- Build a Case: For a more professional look, build or purchase a case to house your components. This not only protects the hardware but also provides an aesthetic that resembles traditional gaming consoles.
What Are the Key Benefits of Creating a Homemade Retro Console?
The key benefits of creating a homemade retro console include cost-effectiveness, customization, and nostalgia.
- Cost-Effectiveness: Building your own retro console can be significantly cheaper than purchasing a commercial product. You can utilize old hardware components or purchase low-cost alternatives, allowing you to save money while still enjoying classic games.
- Customization: A homemade console allows for a high degree of personalization. You can choose which games to include, the hardware specifications, and even the design of the console itself, tailoring it to your preferences and ensuring a unique gaming experience.
- Nostalgia: Creating a retro console taps into the feelings of nostalgia associated with classic gaming. By building a system that replicates the look and feel of consoles from your childhood, you can relive those cherished memories while sharing them with a new generation.
- Learning Experience: The process of building a console provides a valuable opportunity to learn about electronics and programming. It can enhance your technical skills, from understanding hardware components to coding emulators, making it an enriching project for DIY enthusiasts.
- Community Engagement: Joining forums and online communities dedicated to retro gaming and console building can foster connections with like-minded individuals. Sharing your project, seeking advice, or collaborating can enhance your experience and provide support throughout the building process.
What Popular Retro Consoles Can Inspire Your DIY Project?
Some popular retro consoles that can inspire your DIY project include:
- Nintendo Entertainment System (NES): The NES is a classic 8-bit console that revolutionized home gaming in the 1980s. Building a homemade NES can be achieved by using Raspberry Pi or similar single-board computers, allowing you to emulate a vast library of retro games while utilizing original NES controllers for an authentic experience.
- Sega Genesis: The Sega Genesis is known for its iconic 16-bit graphics and a wide range of beloved titles. For a DIY project, you can create a Sega Genesis clone using FPGA technology, which not only allows for game emulation but also offers the ability to customize and enhance the gaming experience with modern features like HDMI output.
- Super Nintendo Entertainment System (SNES): The SNES is celebrated for its rich library of games and advanced graphics capabilities for its time. A homemade SNES can be built using emulation software on a Raspberry Pi, and you can incorporate original SNES controllers or create a unique case design that pays homage to the classic console.
- Atari 2600: As one of the first home gaming consoles, the Atari 2600 has a nostalgic charm that many retro enthusiasts adore. You can create a DIY Atari 2600 using a microcontroller and a few simple components, enabling you to play classic games while preserving the feel of the original hardware with a custom-built wooden enclosure.
- Neo Geo: Known for its arcade-quality games, the Neo Geo is a favorite among fighting game fans. For a DIY project, consider building a Neo Geo-style arcade cabinet using a Raspberry Pi and emulators, allowing you to enjoy arcade classics with authentic joystick controls and a custom display setup.