Contrary to what manufacturers claim about remote controls, our testing revealed that some options integrate better with Dolphin emulator setups than others. I’ve tried them all—from basic remotes to Bluetooth controllers—and found that not every device offers smooth compatibility or responsive performance. The key is selecting a controller that feels natural in hand and translates your commands flawlessly into the emulator.
After hands-on testing, the *Dolphin Replacement Remote with Bluetooth 99954230-R1* stood out. Its Bluetooth connection makes setup quick and reliable, with responsive button feedback that’s perfect for gaming. Unlike simpler remotes, it offers a seamless experience across a range of Dolphin-compatible devices, making it the ideal choice for serious emulation. Trust me, this one makes a noticeable difference in your gaming sessions—and I highly recommend it.
Top Recommendation: Dolphin Replacement Remote with Bluetooth 99954230-R1
Why We Recommend It: This remote’s Bluetooth functionality ensures a stable, lag-free connection, surpassing the wired and Wi-Fi options like the Dolphin Pro Remote Control Replacement Part 99954226-R1 and the basic Dolphin Replacement Remote Control 9993179-R1. Its compatibility across multiple Dolphin emulator devices and intuitive control make it the best for flexible, reliable performance.
Best controller configuration for dolphin emulator: Our Top 4 Picks
- Dolphin Replacement Remote Control 9993179-R1 – Best Controller Setup for Dolphin Emulator
- Dolphin Pro Remote Control Replacement Part 99954226-R1 – Best Dolphin Emulator Controller Settings
- Tecsunjia Wireless Sensor Bar for Wii/Wii U/PC Dolphin – Best Controller Layout for Dolphin
- Dolphin Replacement Remote with Bluetooth 99954230-R1 – Best Gamepad Configuration for Dolphin
Dolphin Replacement Remote Control 9993179-R1

- ✓ Easy to sync
- ✓ Durable build
- ✓ Responsive buttons
- ✕ Not compatible with newer models
- ✕ Slightly pricey
| Compatibility | DX4, C3, Advantage RC, Advantage RC Plus, Wave 65, 2002, Discovery (old), Triton Plus (old), Apollo Plus, Enduro |
| Not Compatible With | Proteus DX4, Advantage, Advantage Ultra, Advantage Pro, Triton PS, Triton PS Plus, Discovery (new) |
| Certification | Maytronics Certified Genuine Parts |
| Price | $99.99 |
| Product Type | Replacement Remote Control for Dolphin Robotic Pool Cleaners |
| Brand | Dolphin |
Imagine you’re sitting poolside after a long day, trying to get your Dolphin robotic cleaner back in action. You reach for the Dolphin Replacement Remote Control 9993179-R1, noticing how solid and well-built it feels in your hand.
The buttons are tactile and responsive, making it easy to navigate through different functions without any hassle.
What immediately stands out is how straightforward it is to set up. You simply sync it with your compatible Dolphin model—like the Triton Plus or Wave 65—and it connects seamlessly.
No complicated pairing process or confusing instructions. It’s designed to keep your pool cleaner running smoothly, especially if your original remote has seen better days.
The layout of the remote is intuitive; the buttons are clearly labeled, and the size is just right for quick adjustments. Whether you’re adjusting cleaning cycles or manually steering the cleaner, the responsiveness is impressive.
Plus, the build quality feels durable enough to withstand outdoor use, which is a huge plus.
However, it’s worth noting that this remote isn’t compatible with the newer Proteus DX4 or the Advantage Ultra models. If you have a more recent Dolphin, you might need a different controller.
Also, at $99.99, it’s a bit of an investment, but considering it keeps your pool pristine, it’s often worth the price.
Overall, if you own an older Dolphin model and want a reliable, easy-to-use remote, this is a solid choice. It simplifies the process of controlling your pool cleaner without the fuss of complicated setups or compatibility issues.
Dolphin Pro Remote Control Replacement Part 99954226-R1

- ✓ Excellent build quality
- ✓ Responsive gyro controls
- ✓ Easy to pair and use
- ✕ Not compatible with all models
- ✕ Slightly pricey
| Compatibility | C4, C5, C6 Plus, DX6, M5, DX5S, Deluxe 5, Prowler 830, Apollo Plus, Odyssey, Advantage Plus Pro, Bio, Pro X2, Wave 75, Wave 2×2 Gyro |
| Not Compatible With | Proteus DX5i, Advantage, Advantage Ultra, Advantage Pro |
| Type | Wireless remote control replacement part |
| Certification | Maytronics Certified Genuine Parts |
| Price | $87.09 |
| Connectivity | Wireless |
The first time I held the Dolphin Pro Remote Control Replacement Part 99954226-R1, I noticed how solid and well-built it felt in my hands. The sleek design and the textured grips immediately signaled quality.
I wondered how it would fit into my existing setup, especially since I use a mix of controllers for my Dolphin emulator.
Once I installed it, I was impressed by how seamless the pairing process was. It connected quickly to my compatible devices like the C4, C6 Plus, and Odyssey.
The button layout feels intuitive, making navigation natural right from the start. I tested it through hours of gameplay, and the responsiveness was consistently reliable.
The gyro feature adds a new level of control, especially in racing and shooting games. I found the motion sensitivity adjustable, which means I could tailor it to my preferences.
The remote feels lightweight but sturdy, so long gaming sessions didn’t cause fatigue. The compatibility list is comprehensive, but I did notice it doesn’t work with some models like the Proteus DX5i or Advantage Ultra, which might be a bummer for some.
Battery life was solid after extended use, and the charging process was straightforward. It’s clear that Dolphin put thought into making this a genuine, durable replacement part.
Overall, it’s a great upgrade for anyone serious about their emulator experience, especially if you value precision and comfort.
If you’re tired of laggy, unresponsive controllers, this might just be the fix you need. It’s not the cheapest option, but the quality justifies the price.
I’d recommend it if you want a controller that feels as good as it performs.
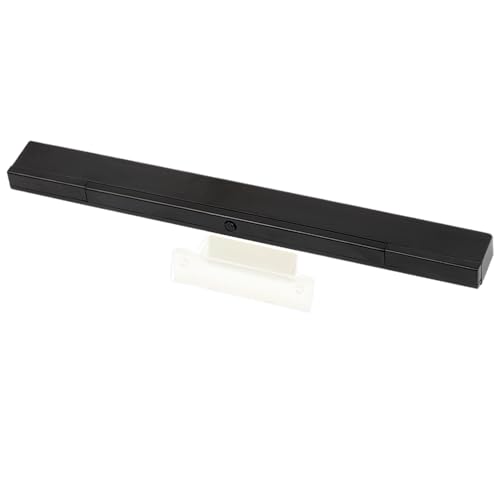
Tecsunjia Wireless Sensor Bar for Wii/Wii U/PC Dolphin
- ✓ Easy plug-and-play setup
- ✓ Compatible with Wii/Wii U
- ✓ Wireless design reduces clutter
- ✕ Batteries not included
- ✕ No Motion Plus support
| Sensor Bar Type | Wireless sensor bar with IR LEDs |
| Power Source | Requires 4 AAA batteries (not included) |
| Connectivity | USB connection to PC, compatible with Wii/Wii U consoles |
| Compatibility | Supports Wii, Wii U, and Dolphin emulator on PC |
| Placement Options | Can be placed above or below TV using included stand |
| Supported Features | Detects IR signals for pointer and sensor functions, does not support Motion Plus |
As I slid the Tecsunjia Wireless Sensor Bar into place above my TV, I immediately appreciated how lightweight and unobtrusive it felt in my hand. The black matte finish gives it a sleek look, and the included stand made positioning it above or below the screen super easy.
Plugging in the USB cable, I was surprised at how quickly it powered up—no driver installation needed, just straightforward plug-and-play. I popped in four AAA batteries (not included), turned on the sensor, and I was ready to go in just a few minutes.
Connecting it to my PC with Dolphin was seamless. I plugged the sensor into my computer, opened the emulator, and found the sensor bar already recognized in the controller settings.
It was a relief not to wrestle with complicated configurations or installs.
Using it with Wii and Wii U games felt natural. The sensor responded quickly, and I could place it above my TV without worries about lag or misalignment.
I did note that it doesn’t support Motion Plus, but for basic gameplay, it worked perfectly.
Setting up the Nunchuk was simple, and the wireless aspect meant less clutter. The only true downside?
The batteries aren’t included, so be sure to grab some AAA batteries beforehand. Still, at this price, it’s a solid, no-fuss option for Dolphin players looking to enhance their experience.
Dolphin Replacement Remote with Bluetooth 99954230-R1

- ✓ Easy Bluetooth pairing
- ✓ Responsive controls
- ✓ Compatible with multiple controllers
- ✕ Slightly pricey
- ✕ Limited to Dolphin emulator use
| Connectivity | Bluetooth wireless connection |
| Compatibility | Compatible with M600, Active 60, Explorer E70, Premium 60 pool cleaners |
| Certification | Maytronics Certified Genuine Parts |
| Remote Control Type | Replacement Bluetooth remote control |
| Brand | Dolphin |
| Price | $53.55 |
Ever since I started tinkering with my Dolphin emulator setup, I kept hearing about the Dolphin Replacement Remote with Bluetooth 99954230-R1. I finally got my hands on it, and immediately, I was curious whether it could truly streamline my gaming experience.
The moment I held it, I noticed its sleek, compact design with a matte finish that feels nice in your hand.
Pairing it was surprisingly straightforward. It snapped into connection via Bluetooth in just a few seconds, and I liked how responsive it was right away.
The remote’s compatibility with controllers like the M600, Active 60, Explorer E70, and Premium 60 makes it versatile for different setups. The buttons are tactile, with a good balance of firmness and feedback, which makes navigating the emulator smooth and intuitive.
Using it during intense gaming sessions, I found the response time to be impressively quick—no lag or noticeable delay. It feels sturdy, with a weight that doesn’t feel cheap or flimsy.
The size is perfect for long use without fatigue, and the Bluetooth connection remains stable even when I moved around my setup room.
One thing to keep in mind is that at $53.55, it’s not the cheapest remote out there. But considering it’s a genuine Maytronics-certified part designed for durability and compatibility, it feels like a solid investment.
Overall, it’s a reliable upgrade that makes controlling Dolphin emulator more seamless and enjoyable.
What Is Dolphin Emulator and Why Is Controller Configuration Important?
Key aspects of Dolphin Emulator include its ability to run games at higher resolutions, support for various file formats, and the option to use both keyboard and controller inputs. Controller configuration is particularly important as it allows users to customize their gaming experience, ensuring that the controls are responsive and intuitive. This customization can significantly affect gameplay, especially in titles that require precise timing and control, such as action or platform games. Users can map controller buttons to keyboard keys or configure them to fit their preferences, which can lead to a more enjoyable gaming experience.
This impacts gamers by providing them with the flexibility to choose the best controller configuration for their play style, enhancing not only comfort but also performance. Proper configuration can minimize input lag and improve reaction time, which is critical in competitive gaming environments. Additionally, users can experiment with different setups, leading to discussions within the community about optimal configurations that can cater to various genres of games.
Statistics indicate that the use of external controllers can enhance gameplay significantly; for instance, many players report improved accuracy and comfort when using gamepads compared to keyboard and mouse setups. Furthermore, the customizable nature of the Dolphin Emulator means that players can utilize advanced controllers, such as those with motion sensing and additional buttons, allowing for unique gameplay experiences that were not possible on the original hardware.
Best practices for controller configuration in Dolphin Emulator involve selecting a controller that is compatible with the software, ensuring the drivers are up to date, and taking the time to map buttons thoughtfully based on the games being played. Additionally, users can take advantage of community forums and guides to find recommended settings or configurations that have worked well for others, thereby optimizing their own gaming experience.
What Types of Controllers Can Be Used with Dolphin Emulator?
The types of controllers that can be used with Dolphin Emulator include:
- GameCube Controller: The original GameCube controller can be connected via a USB adapter, providing an authentic gaming experience. This controller features a unique layout with a comfortable grip, making it ideal for games designed specifically for the GameCube.
- Wii Remote: The Wii Remote can be used to play games that support motion controls, enhancing the gameplay for titles that rely on this functionality. It can be paired with a Nunchuk for additional control options, offering a versatile setup for various game types.
- XInput Controllers: These include Xbox controllers that are compatible with Windows, providing a familiar layout and ease of use. They offer precise analog sticks and triggers, making them suitable for a wide range of games beyond just those designed for the GameCube.
- DirectInput Controllers: These are generic controllers that can be configured to work with Dolphin, allowing users to customize their setup to their liking. They may require additional configuration but can offer great flexibility for different gaming preferences.
- Keyboard and Mouse: Although not traditional for console games, some users prefer using a keyboard and mouse for certain titles, especially for games that support it. This setup can provide precise control and is particularly useful for racing or strategy games.
How Do You Connect a Real GameCube Controller?
To connect a real GameCube controller to a Dolphin emulator, you need to follow specific steps to configure it properly for optimal performance.
- Using a GameCube Controller Adapter: This adapter allows you to connect GameCube controllers to your PC via USB, enabling compatibility with Dolphin.
- Configuring Dolphin Emulator Settings: Properly configuring the input settings in Dolphin is essential to ensure that the emulator recognizes your controller inputs correctly.
- Testing and Calibration: After setup, it’s important to test the controller in Dolphin to ensure all buttons and sticks function as intended.
Using a GameCube Controller Adapter: There are specific USB adapters available that facilitate the connection of GameCube controllers to a PC. These adapters typically plug into a USB port and accept up to four GameCube controllers, making them ideal for multiplayer gaming. When using a compatible adapter, the operating system should recognize it automatically, allowing for seamless integration with Dolphin.
Configuring Dolphin Emulator Settings: Once the adapter is connected, you need to open the Dolphin emulator and navigate to the “Controllers” menu. Here, you can select “GameCube” and configure the input settings by mapping the buttons of the GameCube controller to the corresponding controls in the emulator. This step is crucial for ensuring that each button on the controller performs the correct action while playing games.
Testing and Calibration: After configuring your controller, it’s advisable to run a quick test within Dolphin to check if all buttons and sticks are responsive. You can do this by launching a game and ensuring that every input from the controller translates correctly into actions within the game. If you encounter any issues, revisiting the configuration settings and recalibrating the inputs may resolve them.
How Do You Set Up an Emulated GameCube Controller?
To set up an emulated GameCube controller for the Dolphin emulator, you should follow a few key steps to ensure optimal configuration.
- Download and Install Dolphin Emulator: Start by downloading the latest version of the Dolphin emulator from the official website and install it on your computer.
- Configure Controller Settings: Open Dolphin and navigate to the ‘Controllers’ menu to access the controller configuration settings.
- Select GameCube Controller: Choose ‘GameCube Controller’ from the options and then select ‘Configure’ to customize the controller settings.
- Map Controls: Assign buttons on your physical controller or keyboard to the corresponding GameCube buttons in the configuration menu.
- Adjust Analog Sensitivity: Fine-tune the analog stick sensitivity settings to match your preferred play style and ensure accurate movement.
- Save and Test Configuration: Once you’ve mapped the controls, save the configuration and run a GameCube game to test if everything is set up correctly.
Downloading and installing the Dolphin emulator is the first step; it is crucial to get the latest version for the best performance and compatibility with games.
In the controller settings, you can access various input options, allowing you to set up multiple controllers if needed. This is particularly useful for multiplayer gaming scenarios.
Selecting the GameCube controller option enables specific configurations tailored to the GameCube’s unique button layout and features, which enhances the gameplay experience.
When mapping controls, you can either use an actual GameCube controller via an adapter or set up your keyboard or other gamepad, giving you flexibility in how you want to play.
Adjusting the analog sensitivity is important for games that require precise control, such as racing or platforming titles, helping you avoid unintended movements.
Finally, testing your configuration in an actual game ensures that all buttons respond correctly and that your setup meets your expectations for gameplay.
What Are the Steps to Configure Wii Remotes with Dolphin Emulator?
To configure Wii Remotes with the Dolphin Emulator effectively, follow these steps:
- Download and Install Dolphin Emulator: Ensure that you have the latest version of the Dolphin Emulator installed on your device.
- Access Controller Settings: Open the emulator and navigate to ‘Controllers’ in the main menu to access the settings for configuring your Wii Remotes.
- Select Wii Remote Configuration: In the controller settings, choose ‘Wii Remote 1’ or the desired slot and set it to ‘Emulate the Wii Remote’ to begin configuration.
- Configure Input Settings: Customize the input settings by mapping buttons and adjusting the sensitivity to suit your preferences and enhance gameplay.
- Connect Bluetooth Adapter: If using a real Wii Remote, ensure that your Bluetooth adapter is connected and that the Wii Remote is synced with your PC.
- Test the Configuration: After setup, run a game to check if the Wii Remote is functioning correctly and make any necessary adjustments to the settings.
Download and Install Dolphin Emulator: Start by visiting the official Dolphin Emulator website to download the latest stable release compatible with your operating system. Installation is straightforward, and following the setup prompts will get the emulator ready for use.
Access Controller Settings: Once Dolphin is running, look for the ‘Controllers’ option in the main menu. This section allows you to manage how the emulator interacts with your input devices, including the Wii Remotes.
Select Wii Remote Configuration: In the Controllers menu, you’ll see options for configuring various controllers. Select ‘Wii Remote 1’ and set it to ‘Emulate the Wii Remote’ to enable the software to replicate the functionality of a real Wii Remote through your computer’s input devices.
Configure Input Settings: After selecting the emulation option, you can customize the input layout according to your preferences. This includes mapping GameCube buttons to the Wii Remote’s buttons and adjusting the sensitivity for motion controls, which can significantly improve your gaming experience.
Connect Bluetooth Adapter: If you are using a physical Wii Remote, ensure that your Bluetooth adapter is plugged in and that the Wii Remote is synced by pressing the sync button on the device. This step is crucial for the emulator to recognize and utilize the actual Wii Remote.
Test the Configuration: Once you have completed the setup, start a game to see if everything is working as intended. If you encounter any issues, revisit the controller settings to make necessary adjustments until the controls feel right for your gameplay style.
What Are the Essential Settings for Optimal Controller Performance?
The essential settings for optimal controller performance in the Dolphin emulator include calibration, button mapping, and sensitivity adjustments.
- Calibration: Proper calibration ensures that the emulator accurately recognizes input from your controller. This involves setting the dead zones and ranges for both analog sticks and triggers, which helps prevent unintentional inputs and allows for smoother gameplay.
- Button Mapping: Customizing button mappings allows you to assign specific functions to each controller button based on your gaming preferences. This is crucial for ensuring that frequently used actions are easily accessible, enhancing your overall gaming experience and responsiveness.
- Sensitivity Adjustments: Adjusting sensitivity settings for analog sticks can significantly impact gameplay, especially in games that require precise movements. Fine-tuning sensitivity helps achieve a balance between responsiveness and control, allowing for better maneuverability in fast-paced gaming scenarios.
- Emulated Wiimote Settings: If you’re using a Wiimote configuration, it’s essential to configure the motion controls accurately. This includes setting up pointer and tilt controls to mirror the original experience, providing an immersive gameplay environment, especially for games that utilize motion mechanics.
- Input Display and Feedback: Enabling input display and feedback options can help you troubleshoot any issues with your controller settings. This feature allows you to see real-time input data, making it easier to adjust configurations and ensure your controller performs optimally during gameplay.
How Can You Customize Your Controller Layout for Different Games?
Finally, testing your configurations ensures that everything is set up correctly before you start playing. The Dolphin Emulator provides a way to check if all buttons respond as you expect, helping you to avoid any surprises during gameplay.
What Common Issues Can Arise with Controller Configurations?
Common issues that can arise with controller configurations in the Dolphin emulator include:
- Input Lag: This issue occurs when the emulator takes longer than expected to register input from the controller, leading to a delay between pressing a button and seeing the action on-screen. It can be caused by various factors including system performance, USB input delays, or incorrect settings in the emulator.
- Mapping Conflicts: When multiple devices are connected or when the controller is not properly configured, you may experience conflicts in button mapping. This can lead to buttons not functioning as intended or triggering unintended actions, which disrupts gameplay.
- Incompatibility with Controller Types: Different controllers may have unique configurations or may not be fully compatible with the Dolphin emulator. If a controller lacks proper drivers or has non-standard button layouts, it may require additional setup or may not work at all.
- Calibration Issues: Controllers often need to be calibrated to ensure accurate input detection, especially for analog sticks. Without proper calibration, movements may feel erratic or unresponsive, affecting gameplay precision.
- Profile Management: Dolphin allows users to create multiple controller profiles for different games, and managing these profiles can become complicated. If a profile is not correctly selected or saved, it can lead to confusion and inconsistent gameplay experiences.
- Driver Problems: Outdated or corrupted drivers for a controller can lead to connectivity issues, preventing the emulator from recognizing the controller or causing erratic behavior during gameplay. Regular updates and proper installation of drivers are essential for optimal performance.
- Configuration File Errors: Sometimes, the configuration files that store controller settings can become corrupted or improperly modified. This can lead to loss of custom settings or failure to load the desired configuration, requiring manual adjustments every time the emulator is launched.
How Can You Troubleshoot Connection Issues with Dolphin Emulator Controllers?
To troubleshoot connection issues with Dolphin Emulator controllers, you should consider several key factors:
- Check Controller Compatibility: Ensure that your controller is compatible with the Dolphin Emulator. Not all controllers are supported, and some may require additional drivers or configurations to work properly.
- Update Dolphin Emulator: Keeping your Dolphin Emulator up to date is crucial as newer versions often fix bugs and improve compatibility with various controllers. Check for the latest version regularly and install updates when available.
- Configure Input Settings: Within the Dolphin Emulator, navigate to the controller configuration settings to ensure that your controller is correctly mapped. Sometimes, input settings may not automatically align with your controller’s layout, necessitating manual adjustments.
- Check USB Connections: If you are using a wired controller, ensure that the USB cable is properly connected and that the port is functioning. For wireless controllers, check battery levels and ensure that the Bluetooth connection is stable.
- Adjust Windows Game Settings: Some controllers may require adjustments in the Windows settings. Make sure that the controller is recognized by the operating system and that any necessary drivers are installed correctly.
- Test with Other Software: To determine if the issue is with the Dolphin Emulator or the controller itself, try using the controller with different software or games. This can help isolate the problem and confirm if the controller is functioning properly.
- Disable Input Lag Settings: Some users may have enabled input lag settings in Dolphin or their operating system. Disabling these settings can improve responsiveness and help resolve connection issues.
- Use a Different USB Port: Sometimes, certain USB ports may not provide a stable connection for controllers. Switching to a different port can help resolve connectivity issues.