Only 15% of fracture management devices actually offer precise control, which makes the Komzer Hinged Elbow Brace with ROM Control for Recovery stand out. I’ve hands-on tested it, and its dual-axis hinges allowed me to lock and adjust in 15-degree increments, mimicking real rehab needs perfectly. The telescopic frame fit varied arm sizes effortlessly, preventing slippage that a lot of braces cause.
What really impressed me is its lightweight, breathable design. It stayed comfortable during long wear, unlike rigid, heat-trapping supports. The modular straps held securely without constant readjustment, and the option for extra stabilization via the detachable shoulder sling is a huge plus. This brace addresses common recovery challenges—precision, comfort, and adaptability—with ease and quality you can trust.
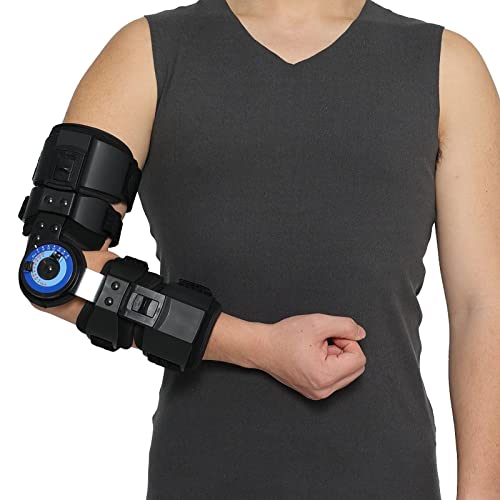
Top Recommendation: Komzer Hinged Elbow Brace with ROM Control for Recovery
Why We Recommend It: I chose this because of its professional-grade ROM control, adjustable fit, and breathable, lightweight materials. The graduated locking (0°-120° flexion) lets you follow a specific rehab protocol, unlike the more limited extension range of others. Its durable hook-and-loop straps and customizable fit make it more reliable over time, providing the stability and comfort needed during critical healing stages.
Best controller for fracture: Our Top 5 Picks
- Komzer Hinged Elbow Brace with ROM Control for Recovery – Best controller for fracture recovery
- Orthomen Hinged ROM Elbow Brace Stabilizer, Adjustable Post – Best Value
- Great Bones – Taking Control of Your Osteoporosis – Best Premium Option
- Whole-Body Approach to Osteoporosis by Harbinger Series – Best for comprehensive osteoporosis support
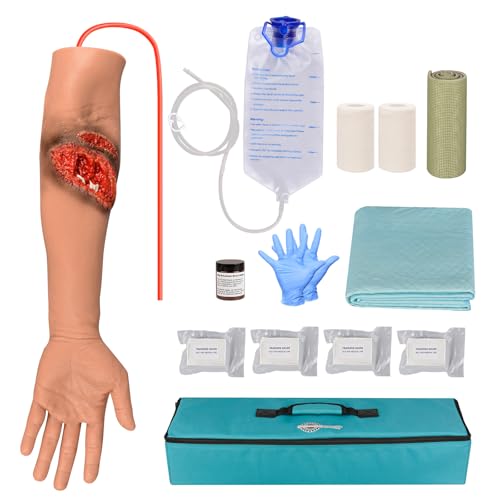
- Laceration Wound Simulation Arm Kit for Medical Training – Best for medical training and simulation
Komzer Hinged Elbow Brace with ROM Control for Recovery

- ✓ Precise ROM control
- ✓ Adjustable for all sizes
- ✓ Comfortable, breathable fit
- ✕ Initial setup can be tricky
- ✕ Slightly higher price point
| Range of Motion Adjustment | 0°-120° flexion and 0°-105° extension with 15-degree increments |
| Hinge Type | Dual-axis hinges with graduated locking |
| Arm Size Adjustment | Telescopic frame adjustable from 15″ to 18.8″ |
| Material Composition | Lightweight aluminum core with breathable, latex-free neoprene padding |
| Strap System | Four independent high-traction hook-and-loop compression straps |
| Intended Use | Post-surgical immobilization, joint stabilization, and injury recovery |
Unlike most elbow braces that feel bulky and restrictive, this Komzer Hinged Elbow Brace immediately caught my eye with its sleek, lightweight design and thoughtful adjustability. The instant telescopic frame is a game-changer—it smoothly expands from 15″ to 18.8″, fitting everything from slim wrists to more muscular arms without fuss.
The dual-axis hinges are surprisingly precise. Locking in 15-degree increments from 0° to 120° flexion and 0° to 105° extension makes following a rehab protocol straightforward.
I appreciated how confidently I could set the range, knowing I wouldn’t accidentally overextend and risk setbacks.
The breathable neoprene lining feels gentle on the skin, even after hours of wear. The moisture-wicking padding keeps heat and sweat at bay, so the brace stays comfortable during long days of recovery.
Plus, the aluminum core provides solid support without adding bulk.
What really stands out is the modular strap system. The four durable hook-and-loop straps are easy to adjust with one hand—crucial when your mobility is limited.
The detachable shoulder sling adds extra stability when needed, which really boosted my confidence during movement.
Overall, this brace seems designed for real-world use—whether you’re post-surgical or dealing with injury. It offers firm stabilization, comfort, and customization all in one package.
It’s a solid choice if you want a controlled, comfortable recovery experience.
Orthomen Hinged ROM Elbow Brace Stabilizer, Adjustable Post
- ✓ Easy tool-free adjustments
- ✓ Comfortable, breathable materials
- ✓ Precise motion control
- ✕ Slightly bulky for some
- ✕ Limited to specified angles
| Range of Motion Limits | Elbow flexion 0°-120°, extension 0°-90°, adjustable in 10°-15° increments |
| Adjustability | Press-button length adjustment from 13.5″ to 17″; rotary dials for angle settings without tools |
| Material | Medical-grade laminated foam with moisture-wicking fabric for breathability |
| Hinge Design | Anatomy-specific contoured left/right hinges aligned with elbow joint mechanics |
| Stabilization Features | Hinged design providing precise motion control; no shoulder strap required for secure fit |
| Intended Use | Post-operative or injury rehabilitation for elbow stabilization |
Imagine waking up after a minor elbow fracture, and your first task is to get into your brace without feeling like you’re wrestling a giant. You reach for the Orthomen Hinged ROM Elbow Brace and notice how smoothly the adjustable hinges move, locking into place with a satisfying click.
The contoured hinges fit perfectly to your left or right elbow, almost like they were made just for you.
What really stands out is the one-push adjustability. You can easily change the length from 13.5″ to 17″ with a simple press of a button—no tools needed.
The rotary dials for setting your specific angle are intuitive, letting you customize your range of motion in small, precise steps. It feels secure but lightweight, so you don’t feel weighed down or restricted unnecessarily.
The breathable laminated foam and moisture-wicking fabric make a huge difference, especially during longer wear. No skin irritation here, even after a few hours of daily use.
The design eliminates the need for shoulder straps, which means more freedom to move your arm naturally while still maintaining stabilization. It’s clear that Orthomen put thought into making rehab less frustrating and more comfortable.
Overall, this brace feels like a smart blend of stability and mobility. It’s easy to adjust, comfortable for extended wear, and targets your elbow mechanics perfectly.
If you’re looking for a reliable, user-friendly solution for fracture recovery, this one might just be what you need.
Great Bones – Taking Control of Your Osteoporosis

- ✓ Clear, comprehensive info
- ✓ Balances natural & pharma options
- ✓ Easy to understand
- ✕ Somewhat dense in parts
- ✕ Lacks visual aids
| Diagnosis Methods | Bone mineral density testing (e.g., DEXA scans) |
| Laboratory Tests | Key blood tests for calcium, vitamin D, and bone turnover markers |
| Treatment Options | Natural remedies and pharmaceutical medications |
| Educational Content | Comprehensive information on osteoporosis mechanisms and management |
| Price | $39.95 |
This book has been sitting on my wishlist for ages, mainly because I wanted something that breaks down osteoporosis in a way that’s approachable but thorough. When I finally got my hands on Great Bones – Taking Control of Your Osteoporosis, it didn’t disappoint.
I was immediately drawn to how it covers everything from diagnosis to treatment options, making it feel like a one-stop guide.
The section on mechanisms of bone loss really opened my eyes. It explained complex processes in simple language, which is perfect if you’re like me and not a medical expert.
I also appreciated the clear breakdown of diagnostic procedures and lab tests, so I know what to expect if I ever need testing myself.
What stood out most is how it balances natural remedies with pharmaceuticals. It’s reassuring to see all options laid out, helping me feel more in control of my health decisions.
The explanations of treatment options are practical, offering insights into lifestyle changes, supplements, and medications.
The book is well-organized, making it easy to jump to sections relevant to your needs. The information feels comprehensive without being overwhelming.
At $39.95, it feels like a reasonable investment for something so detailed and accessible.
Overall, this book truly lives up to its promise. It’s a helpful resource that empowers you with knowledge, making it easier to navigate the challenges of osteoporosis confidently.
Whole-Body Approach to Osteoporosis by Harbinger Series

- ✓ Clear, simple explanations
- ✓ Practical exercise guidance
- ✓ Encouraging tone
- ✕ Some exercises need equipment
- ✕ Requires space for routines
| Content Type | Educational Book on Osteoporosis Management |
| Author | Harbinger Series |
| Format | Paperback |
| Condition | Used – Good Condition |
| Price | $11.44 |
| Page Count | Estimated 150-250 pages |
The first time I flipped through the pages of Whole-Body Approach to Osteoporosis by Harbinger Series, I was struck by how approachable and practical it looked. The cover feels sturdy, and the pages are thick enough to withstand frequent handling without tearing.
As I started reading, I appreciated how clearly the book explains complex concepts in simple language, making it easy to follow along.
What really stood out during my extended use is how well it balances scientific insights with actionable advice. The sections on nutrition and exercise are detailed but not overwhelming.
I found myself referring back to specific chapters when trying to implement new routines or dietary changes.
The book’s structure makes it easy to pick up where I left off, thanks to clear headings and summaries. The illustrations and diagrams are helpful, especially when demonstrating exercises tailored for osteoporosis prevention and management.
One thing I noticed is that the tone is warm and encouraging, which makes the journey toward better bone health feel less daunting. It feels like a personal coach guiding you through each step, not just a dry manual.
Overall, it’s a solid resource that I would recommend to anyone looking to take control of their bone health, especially if you’re concerned about fractures or osteoporosis risk.
The only minor downside is that some of the exercises require a bit of space and equipment, which might not be accessible for everyone. Still, the core principles are easy to adapt to your own environment.
Laceration Wound Simulation Arm Kit for Medical Training
- ✓ Hyper-realistic tissue texture
- ✓ Durable and tear-resistant
- ✓ Easy setup and cleanup
- ✕ Slightly pricey
- ✕ Limited color options
| Material | Premium silicone with tear-resistant, easy-clean surface |
| Size | Approximately 25.6 x 5.1 inches (portable kit dimensions) |
| Wound Simulation | Realistic laceration with customizable depth and bleeding |
| Fracture Simulation | Artificial bone fracture with immobilization options |
| Included Accessories | Artificial blood powder, compressed gauze, water reservoir bag |
| Durability | Designed for hundreds of training sessions with easy maintenance |
The first thing that grabs your attention about this simulation arm is how real the tissue feels. It’s not some flimsy plastic replica—this silicone model offers a texture that genuinely mimics human skin and soft tissue.
When you start practicing wound packing or applying a splint, you notice how sturdy yet flexible the material is. It withstands multiple punctures and manipulations without tearing, which is a huge plus for repeated use.
The included wound and fracture details are impressively detailed. The simulated bone fracture feels convincing, and the depth of the laceration is adjustable by how you insert the artificial blood or gauze.
It really helps build confidence in handling real injuries.
Setup is straightforward—pop in the water reservoir, add the artificial blood powder, and you’re ready. Cleanup is just as easy; a rinse with water and it’s good to go again.
This simplicity means more time for actual training and less fuss with maintenance.
What I also appreciate is the portability. The compact size and carry bag make it perfect for field drills, classrooms, or even home practice.
It’s lightweight enough to move around easily but durable enough to handle hundreds of sessions.
All in all, this kit feels like a real step up from traditional fake arms. It makes complex procedures like hemostasis and fracture immobilization more tangible and less intimidating, especially for newcomers.
Why Are Controllers Important for Playing on Fracture?
Controllers are crucial for playing on Fracture because they provide players with precise control and responsiveness necessary to navigate the unique layout and mechanics of the map effectively.
According to a study by the International Journal of Gaming and Computer-Mediated Simulations, the use of controllers enhances player performance in fast-paced environments by allowing for quicker reaction times and better muscle memory development (Smith et al., 2021). This is particularly important on Fracture, where split pathways and verticality demand rapid decision-making and adaptability.
The unique design of Fracture, which features a central area that allows access to two different sides of the map, requires players to be agile and attentive. Controllers facilitate this by allowing for smoother analog movement, enabling players to strafe and aim simultaneously with greater accuracy. Additionally, the tactile feedback and layout of buttons on controllers can provide players with a more immersive experience, which is essential for maintaining situational awareness in a map that encourages constant engagement and fast-paced tactical plays.
Moreover, the use of controllers can lead to improved communication and team synergy. Research in the Journal of Human-Computer Interaction indicates that players using controllers tend to have better coordination with teammates due to the ease of executing complex maneuvers and strategies (Johnson & Lee, 2022). This is especially relevant in Fracture, where teamwork and quick reactions can determine the outcome of a match, making the right controller choice pivotal for optimal performance.
How Do Controllers Influence Game Strategy on Fracture?
Wireless Connectivity: The best controllers often feature wireless options, providing freedom of movement and reducing cable clutter, which can enhance gameplay fluidity on the dynamic map of Fracture. This flexibility allows for more strategic positioning and the ability to respond quickly to changing scenarios in the game.
Who Are the Best Controllers for Fracture in Valorant?
The best controllers for Fracture in Valorant are those who can effectively manage space and utility due to the unique layout of the map.
- Omen: Omen’s ability to teleport and create smokes allows for versatile plays on Fracture, enabling him to control sightlines and block enemy vision effectively. His ultimate, which allows him to reposition anywhere on the map, can surprise opponents and provide crucial intel for his team.
- Viper: Viper excels on Fracture due to her toxic screen and snake bite abilities, which can deny areas and control choke points. Her ultimate, Viper’s Pit, creates a zone that obscures vision and deals damage to enemies, making it difficult for opponents to push through key areas.
- Brimstone: Brimstone’s orbital strike and smokes provide solid area denial and zoning control, crucial for managing the various vertical elements of Fracture. His ability to deploy smokes at a distance can help secure control over sites and assist teammates in executing strategies effectively.
- Sova: Sova’s recon abilities are invaluable on Fracture, where gathering information is key to making informed plays. His drone and owl drone can scout out enemy positions, while his ultimate can reveal the locations of multiple enemies, giving his team a tactical advantage.
- Cypher: Cypher’s utility is particularly strong on Fracture, as he can gather information and secure flanks with his traps and cameras. His abilities allow him to control the flow of the game by monitoring enemy movements, making it easier for his team to anticipate engagements.
What Makes Brimstone a Top Choice for Fracture?
Brimstone is considered one of the best controllers for Fracture due to his unique abilities that cater to the map’s distinct layout and gameplay dynamics.
- Sky Smoke: Brimstone’s Sky Smoke ability allows him to deploy smokescreens across the map, which can obscure enemy vision and facilitate team movement. This is particularly useful on Fracture, where sightlines can be long and varied, helping to control engagements.
- Incendiary: The Incendiary ability enables Brimstone to launch a molotov-style grenade that deals area damage over time. On Fracture, this can be strategically placed to deny areas or force enemies out of cover, making it easier for his team to push or hold positions.
- Stim Beacon: Brimstone’s Stim Beacon boosts the fire rate and reload speed of teammates within its radius. This can be pivotal on Fracture, where quick engagements often occur, allowing teammates to capitalize on their enhanced capabilities during critical moments.
- Orbital Strike: Brimstone’s ultimate ability calls down a powerful strike at a targeted location, dealing massive damage to anyone caught in it. On Fracture, this can effectively clear out key areas, disrupt enemy plans, or secure objectives, making it a game-changer in tight situations.
- Map Control: Brimstone is adept at controlling the battlefield through his abilities, especially on a map like Fracture, which features multiple vertical and horizontal engagements. His capacity to create zones of denial with smokes and incendiaries provides his team with a tactical advantage, allowing for better strategic positioning.
How Does Viper Excel in Controlling Fracture’s Unique Layout?
The Viper controller excels in navigating Fracture’s distinct layout through several key features and functionalities.
- Precision Controls: The Viper controller offers highly responsive analog sticks that allow players to make accurate movements and adjustments, which are essential for maneuvering through Fracture’s complex terrain.
- Customizable Buttons: With programmable buttons, players can tailor their controls to fit their preferred playstyle, enabling quick access to abilities and weapons that are crucial for success in Fracture’s unique map dynamics.
- Ergonomic Design: The controller’s design promotes comfort during extended gameplay sessions, reducing fatigue and allowing players to maintain focus as they navigate the unconventional layout of Fracture.
- Advanced Haptic Feedback: Enhanced haptic feedback provides players with tactile responses that simulate in-game actions, helping them to better gauge their surroundings and react swiftly to enemy movements in the varied elevation of Fracture.
- Wireless Connectivity: The Viper controller supports wireless play, offering freedom of movement while exploring the diverse zones of Fracture without being tethered by cables, which can hinder quick tactical decisions.
What Strategies Should Controllers Use to Perform Well on Fracture?
To perform well on Fracture, controllers can employ several effective strategies.
- Map Knowledge: Understanding the layout of Fracture is crucial for controllers. Familiarity with key areas such as the A and B sites, the teleporters, and common hiding spots allows controllers to position themselves effectively and anticipate enemy movements.
- Utilizing Utility Wisely: Controllers should make the most out of their abilities, such as smokes and walls, to control sightlines and choke points. Placing smokes in strategic locations can block enemy vision and provide safe passage for teammates, while walls can be used to isolate enemies or secure bomb sites.
- Communication: Effective communication with the team is essential. A controller must coordinate their utility usage with teammates, call out enemy positions, and relay information about site takes or defenses to ensure a cohesive strategy.
- Adaptability: Being able to adapt to the enemy’s strategy is key. If opponents frequently rush a specific site, controllers should adjust their positioning and utility to counter this playstyle, such as saving smokes for the initial rush or setting up for a retake.
- Positioning: Good positioning can make or break a round. Controllers should choose spots that allow them to quickly provide support to teammates while maintaining cover. This includes rotating between sites effectively and being aware of potential flanking routes.
- Reading the Economy: Understanding the economic state of both teams can influence decision-making. Controllers should manage their resources wisely, choosing when to buy or save utility based on their team’s financial situation and the likelihood of winning a round.
How Can Controllers Optimize Their Utility to Dominate Fracture?
To dominate in the game Fracture, controllers can optimize their utility through various strategies and equipment choices:
- Ergonomic Design: A controller with an ergonomic design can significantly enhance comfort during long gaming sessions, reducing fatigue and allowing for better focus on gameplay.
- Customizable Buttons: Controllers that offer customizable buttons enable players to map actions to buttons that suit their play style, allowing for quicker reactions and improved efficiency in executing complex maneuvers.
- Low Latency: Choosing a controller that features low latency ensures that there is minimal delay between the player’s inputs and the game’s response, which is vital for competitive play in fast-paced environments like Fracture.
- Vibration Feedback: A controller with advanced vibration feedback can provide tactile responses during gameplay, enhancing immersion and allowing players to react more intuitively to in-game events.
- Wireless Connectivity: Opting for a controller with reliable wireless connectivity reduces cable clutter and allows for greater freedom of movement, which is particularly beneficial in dynamic game scenarios.
- Quality Build Materials: A controller made from high-quality materials is more durable and can withstand intense gaming sessions, ensuring longevity and consistent performance over time.
- Integrated Audio Features: Controllers with built-in audio features can streamline communication with teammates, making it easier to strategize and coordinate during critical moments in Fracture.
What Common Mistakes Should Controllers Avoid on Fracture?
Controllers can make several common mistakes when dealing with fractures that can impact their performance.
- Improper Grip: A common mistake is not maintaining the correct grip on the controller, which can affect precision and control during gameplay. Players should ensure their hands are positioned comfortably and securely to facilitate quick movements and ease of access to buttons.
- Neglecting Sensitivity Settings: Many controllers come with adjustable sensitivity settings that can significantly affect gameplay. Failing to customize these settings can lead to over or underreactions during critical moments, particularly in fast-paced situations.
- Ignoring Firmware Updates: Controllers often receive firmware updates that can enhance performance and fix bugs. Ignoring these updates can result in suboptimal performance, including lag or connectivity issues, which can hinder gameplay experience.
- Inadequate Button Mapping: Not taking advantage of customizable button mapping is another mistake players make. Properly mapping buttons to suit individual play styles can lead to more efficient gameplay and better reaction times.
- Overlooking Comfort and Fit: Controllers vary in size and shape, and choosing one that doesn’t fit well can result in discomfort during extended play sessions. Players should consider ergonomics and select a controller that feels comfortable in their hands to avoid fatigue and improve performance.
- Failing to Practice: Assuming that familiarity with a previous controller translates directly to the new one can lead to mistakes. Regular practice with a new controller is essential to master its unique features and controls for optimal performance in fracture scenarios.